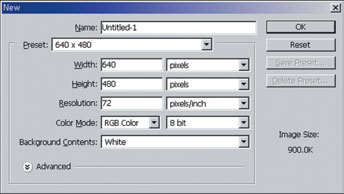
Press Ctrl+N to create a new work window. Click on the Preset box and choose 640×480 to create a 640×480-pixel workspace.
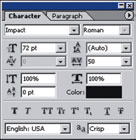
In the toolbox, click on the Default Foreground and Background Colors button to set up the default color and set the foreground color to black and the background color to white. Choose the Horizontal Type Tool from the toolbox and type in the text as shown. In the Character Palette, set the font to Impact and the font size to 72pt. If you can’t see the Character Palette, choose Window > Character from the menu at the top.
Press Ctrl+T to apply the Free Transform command. Drag out the handles on the text to make it larger. Holding down the Shift key while you drag the handles allows you to change the text size proportionately with respect to the height and width. Holding down the Alt key allows you to adjust the size of the text with respect to the center. You can also adjust the text size while holding down both the Shift and Alt keys. Press Enter to finalize the transformation.
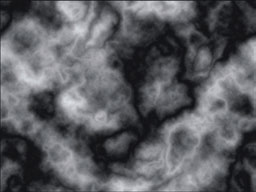
In the Layers Palette, click on the Create a New Layer button at the bottom to create a new layer at the very top of the palette. Choose Filter > Render > Clouds from the menu at the top to create irregular clouds. Choose Filter > Render > Difference Clouds from the menu at the top to apply the filter again. Press Ctrl+F to apply the command again. Continue repeating the command until you arrive at the shape you like.
Choose Filter > Sketch > Conte Crayon from the menu at the top. Set the Foreground Level to 13, the Background Level to 13, the Texture to Sandstone, and the Relief to 20. This filter will open in the Filter Gallery. In the middle of the Filter Gallery panel, there is a selection of thumbnails; this is where you would click and choose the filter you want. Click on the inverted triangle button at the top-right to hide the thumbnails and see the preview window. Click on OK to apply the filter.

Click on the Channels Palette to open it. Hold down the Ctrl key and click on the RGB channel at the top to create a selection frame in the shape of the image. The selection frame that is created will select only the lighter parts of the image, not the darker areas.
Click on the Layers Palette again and drag and drop the text layer onto the Create a New Layer button at the bottom to copy the layer. Click on the Layer Visibility icon next to all the layers, excluding the Background layer and the duplicate text layer, to hide them. Select the duplicate text layer and click on the Add a Mask button at the bottom to create a mask for the selected layer in the shape of the selection frame. The unselected areas will be transparent, allowing you to see the image underneath.
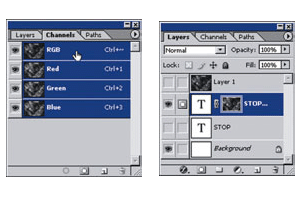
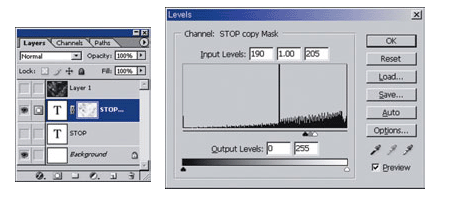
In the Layers Palette, click on the mask thumbnail that was created for the duplicate text layer. A mask edit icon in front of the copied text layer indicates that the mask image can be edited now. Choose Image > Adjustments > Levels from the menu at the top.
Move the black and white tabs at the bottom of the histogram, as shown here. If the bulk of the histogram appears on the left for you, enter 45, 1.00, and 60 in the Input Levels text boxes. This will make the black areas of the mask image (the transparent areas of the layer image) darker and wider.
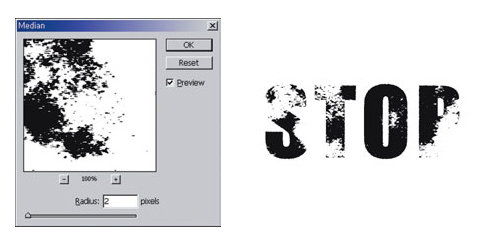
Choose Filter > Noise > Median from the menu at the top and set the Radius to 2 pixels. This will produce clumps of grainy particles on the image and create a rough texture.
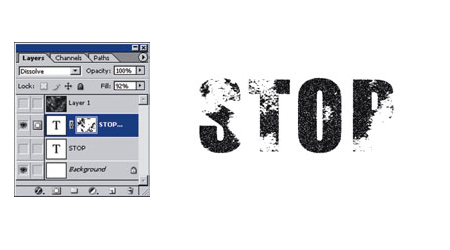
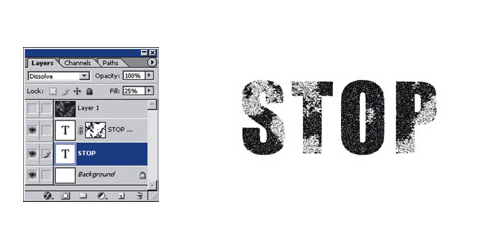
In the Layers Palette, click on the thumbnail of the duplicate text layer and set the Blend Mode to Dissolve and the Fill to 92%. This will make the text image transparent. However, the entire text does not become transparent; it is only certain areas, as if transparent noise was scattered over the text.
In the Layers Palette, click on the hidden text layer so that it is visible again and set the Blend Mode to Dissolve and the Fill to 25%. Noise makes the text blurry and overlaps with the transparent text on top.
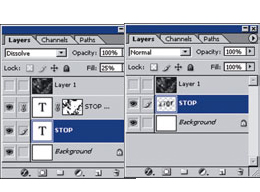
Select the text layer in the Layers Palette. Click on the link icon of the duplicate layer to link the layers, and then press Ctrl+E to blend the linked layers. Now some people get lost at this step, and i dont blame you, this was the worst way to explain it, unfortunatly it was also the best way i knew how, basically if you got lost just do this: Select the layer with the mask and press CTRL+E to merge it down. Then right click on the newly merged layer and chooseRasterize.
Stamped letters or letters such as O and P need a connecting line to connect them together. Choose the Rectangular Marquee Tool from the toolbox. Click on the area where the connecting line will be made and then press Del.

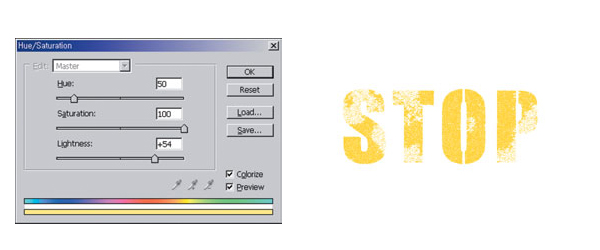
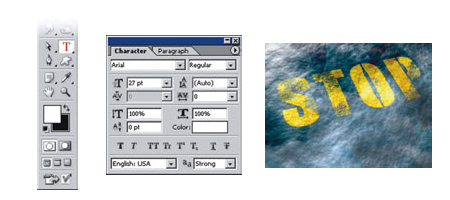
Choose Image > Adjustments > Hue/Saturation from the menu at the top. Check Colorize and then set the Hue to 50, the Saturation to 100, and the Lightness to 54. The text color will change to a dark yellow. Now i dont know what color signs that are on the road are in your state or country, so feel free to change this to any color you want, im simply using the colors that are used here in Brooklyn, New York (thats in the United States for those who dont know).
In the Layers Palette, click on the hidden Layer 1 layer so that it is visible again, and then drag the Layer 1 layer down one. Choose Filter > Render > Clouds from the menu at the top to create irregular clouds. Press Ctrl+F to apply the command again. Continue repeating the command until you arrive at the shape you like.

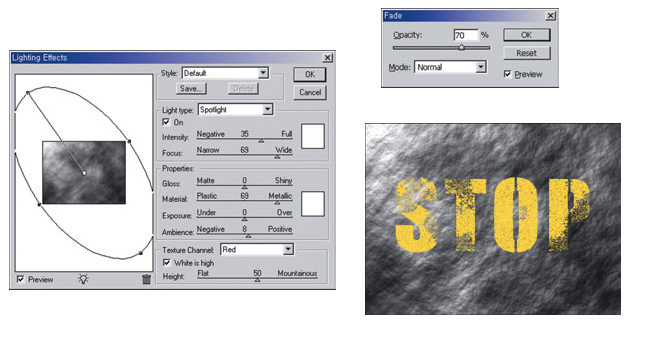
Choose Filter > Render > Lighting Effects from the menu at the top and adjust the graph on the left side of the panel, as shown here. The line in the center shows the direction of the light. As the rounded border becomes more elongated, the angle at which the light shines becomes smaller. Drag the handles at the edges to adjust the angle and direction of light and drag the handles in the center to adjust where the light shines. On the bottom-right of the panel, set the Texture Channel to Red to create dimensionality. After you apply the filter, choose Edit > Fade Lighting Effects from the menu at the top and set the Opacity to 70% to reduce the effect of the filter.
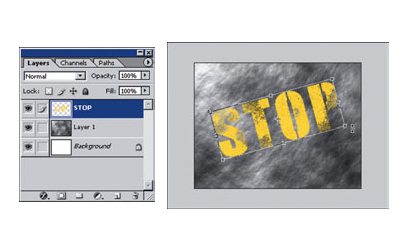
Choose the STOP text layer from the Layers Palette. Press Ctrl+T to apply the Free Transform command. Drag the handles on the corners of the image to slant it, as shown here. Press Enter to apply the transformation.
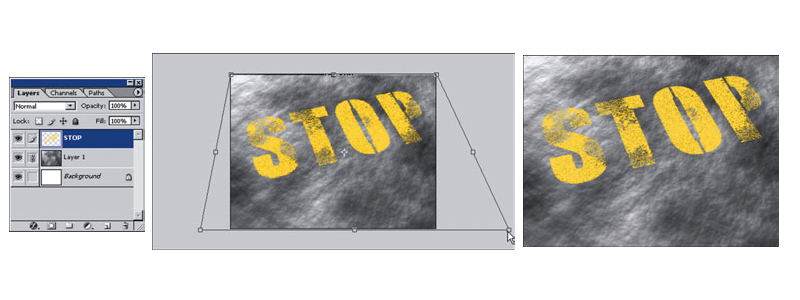
Select the text layer from the Layers Palette and click on the link icon in front of the texture layer below the text layer to link the two layers. Press Ctrl+T to apply the Free Transform command. Hold down the Ctrl key and drag the handles on the corners of the image to spread them out, as shown here. Dragging out the edges of the work window will create a convenient gray space on the outside of the screen. Dimension is added to the image, making it appear more natural. Press Enter to apply the transformation.
The background is reflected gently off the slightly wet road. Go ahead and browse to a nice image of a city, a landscape or something through which a road can possibly be going. Im using an image of a city taken from someones DeviantArt account. Press Ctrl+O and open your selected image.Choose the Rectangular Marquee Tool from the toolbox. Drag the tool over the part of the image you want to use and press Ctrl+C to copy the section you have selected.

Click on the active text window and then click on the Layer Visibility icon in front of the text layer in the Layers Palette to hide it from view. Then select the texture layer (Layer 1). Press Ctrl+V to paste the copied background image onto the new layer. You should see the new layer (Layer 2) in the Layers Palette.
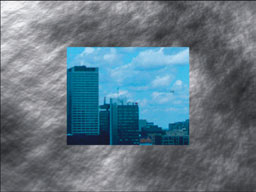
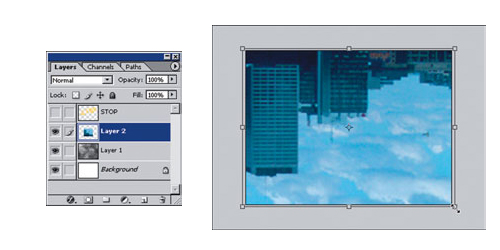
Choose the duplicate background image layer (Layer 2) from the Layers Palette. Choose Edit > Transform > Flip Vertical from the menu at the top to flip the background image vertically. Press Ctrl+T to apply the Free Transform command. Hold down the Shift and Alt keys and drag out the handles on the corners of the image to increase its size (with respect to the height/width and center) so that the image fills up the entire work window. PressEnter to apply the transformation.
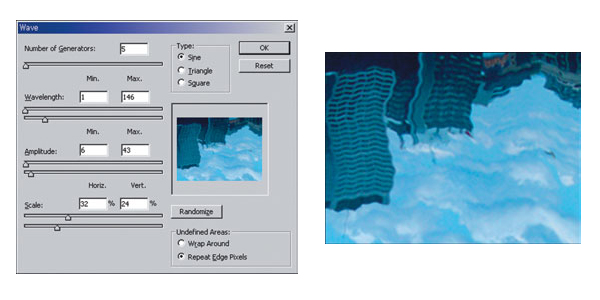
Choose Filter > Distort > Wave from the menu at the top and set the Number of Generators to 5, the Wavelength to 1/146, the Amplitude to 6/43, the Scale to 32/24% and the Type to Sine. The image will be distorted into an irregular wave.
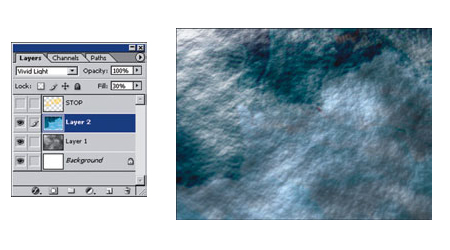
Select the background layer (Layer 2) and set the Blend Mode to Vivid Light and the Fill to 30%. A faint image of the background image will be blended with the rough texture of the road.
Click on the hidden text layers at the top of the Layers Palette (STOP Layer)so that they are visible again, and then set the Blend Mode to Linear Light and the Fill to 55%. This blends the text image naturally with the 3D texture below it.
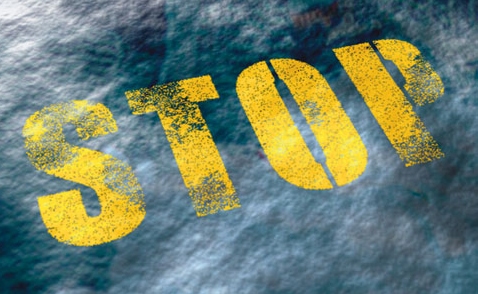
And TA-DA your finished, lets take a look at what we ended up with:
